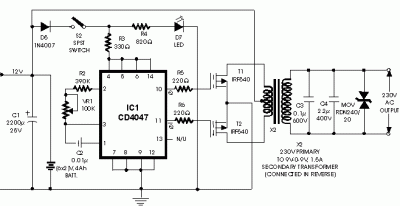
In my previous post, I share to you guys about the 12V to 220V inverter schematic. This
time I would like to share again about inverter, but this time it’s how to make 12V to 220V inverter. The
main component of this small voltage converter to transform 12VDC to 220VAC is
the CMOS 4047. We will used this CMOS 4047 to stable the multi-vibrator, at
pins 10 and 11 will have a symmetrical rectangular signal (square wave) which
is amplified by 2 Darlington transistors and finally reach the secondary coil
of mains transformer (2x10V/60W).
Below are the videos presentations of the comparison between
without load and with load.
Video Presentation 1 – without load
Video Presentation 2 – with load (light bulb)
With the help of P1 the output frequency can be adjusted between 50Hz to
400Hz. Although this is not part of any professional dc ac converter it
can be used quite effective on some home appliances. Be aware that the
output signal is square and not sine wave. So you cannot use it for
powering TV, Laptops, monitors. Use it only for lighting, power tools
and other non-expensive equipment.
Below is the circuit schematic of the converter in 60 Watts from DC to AC.
Creating your own offline ups circuit
diagram is a good idea to secure your backup files is a really a wise idea. With
the increasing daily support on networked data systems, the need for goofproof
backup of power supply systems is now crucial.
UPS applications require ahigh-speed
control MCU with multiple on-chip inverter and converter PWM control functions
thus making the RL78/I1A an ideal choice for continuous commercial power
supplies. Renesas delivers optimal solutions for UPS applications by providing
a variety of semiconductor devices in addition to MCUs.
Optimal for standby(offline) power systems. Timers, 5V operation, small package.
R8C Family
Optimal for standby(offline) power systems. Timers, 5V operation, small package.
EEPROM
R1EX24xxx Series
I2C bus interface. Optimal for power failure recording *1
R1EX25xxx Series
SPI bus interface. Optimal for power failure recording *2
Step-down circuit
MOSFET
RJK60xxDPK
Low on-resistance, high-speed switching
Step-up circuit
MOSFET
RJK1003DPN
Low on-resistance, high-speed switching
Inverter
MOSFET
RJK40/50/60xxDPK
Low on-resistance, high-speed switching
IGBT
RJH60DxDPP/DPK, RSH60FxDPK
low VCE(sat), FRD on-chip
PFC
power supply
IGBT
RJH60DxDPP/DPK
low VCE(sat), FRD on-chip
PFC IC
R2A20115, R2A20112, R2A20117, R2A20118A, R2A20104
Power supply, etc.
Photocoupler
(standard)
PS23xx Series
PS27xx Series
PS28xx Series
High isolation voltage (5kVr.m.s.), 4p-LSOP, Ta=115°C
High isolation voltage (3.75kVr.m.s.), 4p-SOP, Ta=110°C
High isolation voltage (2.5kVr.m.s.), 4p-SSOP, Ta=110°C
Photocoupler
(IGBT drive)
PS93xx Series
(6/8p-SDIP)
PS94xx Series
(16p-SOP)
PS95xx Series
(8p-DIP)
PS99xx Series
(8p-LSDIP)
High isolation voltage (5kV~7.5kVr.m.s.)
0.6~2.5A output
High CMR (CMR≧50kV/μs)
I would like to learn on how to invert 12V DC to 220V AC for
100 watts that’s why I’m doing my research about this because I’m not an Electronic or even an Electrical Engineer.So I need more info on how to do it right to
avoid accident. By doing the research I found some techniques and tutorials on
how to do it easy without deep understanding on it.
In this 12v inverter circuit diagram I used the IC 4047 – IRF540 instead of transistor 2N3055 because it
is a good idea power output for 100W from the transformer 2-3A. For the
information for those who did not know yet that AC can’t be stored
for future use but DC can be stored for future use in a battery. The stored DC
can be converted back to AC by using power inverters. Below is the
schematic diagram of the inverter that I made.
I also created a circuit
diagram inverting 12V DC to 220V AC for 500 Watts.
Today,
one will notice the presence of electronic technology in nearly each side of
human life. Be it the doorbell you ring whereas getting into a house or the
ignition of your automotive, the presence of circuit technology is felt nearly
everyplace. in contrast to the past times, once most product and machines were
based mostly out of mechanical inventions, their sizes and weight were
relatively larger and bulkier compared to the product exhibiting similar
properties nowadays. a straightforward example is drawn from the actual fact
that one will attempt to compare the normally used product like taper coders,
bells, watches, and clocks etc. and see that however their size, weight, shapes
and practicality have modified over the amount of your time. With the
increasing range of users and therefore the value of production, it's become a
challenge for many producing corporations to fulfill the escalating wants of
the growing population. During this era of growing users it's time currently to
seek out alternatives, for manufacturing bulk product with reasonable costs.
it's from here that the circuit technology has picked up its pace. It’s a
longtime indisputable fact that the convenience, compactness and therefore the
comfort extended by the electronic circuits technology is unmatched. indeed it
will not be Associate in Nursing exaggeration to state that it's become tough
to imagine our lives while not these fastidiously designed circuits.
Well!
Electronic styles and electronic circuits are a manifestation of careful and
dedicated acquisition. Additional specifically, these natural philosophy styles
embrace a careful arrangement of minute parts like transistors, resistors, and
capacitors etc. These parts are connected through wires or traces that helps
the electrical signals to flow across the card, thereby permitting the
merchandise or the thing to accomplish its desired perform.
Electronics
circuits are generally classified into 3 forms. These forms embrace Analog,
Digital and therefore the Mixed Signal circuits. The essential distinction
between these classes is that the Analog circuits use energy in its original
type, whereas the Digital ones build use of electrical signals that are created
by logical connections and interpretations. On the opposite hand, the mixed
circuits involve the employment of energy each in original also as signal type
and are additional difficult in nature.
Studying
regarding electronic styles and electronic circuits is not any straightforward
job, as they need a precise set of skills in a very person to be ready to
appreciate their topology and practicality properly. Aquatics through the
online or by merely work on to some dedicated portals, one will notice the
correct answers to his or her queries.
Paul Eisle developed
the first PCB in 1936. However, it became standard solely within the Fifties
once the U.S. military started exploitation the technology in bomb detonators.
Today, PCB Printed Circuit Boards square measure associate integral a part of
the majority instrumentality, like cars, mobile phones, computers and a lot of.
How may be a computer circuit Board Manufactured?
To make a custom PCB, initial the electronic diagram of the
specified circuit is ready exploitation laptop assisted style (CAD) code. Afterward
the PCB model is developed exploitation laptop assisted producing code
technology.
The common materials used for producing PCBs are: FR4, FR4
warmth, Polyimide, GeTek, Rogers, Arlon, Nelco, Alumina, Ceramic, Bakelite,
FR1, CEM1, and CEM5. The dimensions and thickness of the board depends upon the
wants of the circuit. The substrate is coated with a layer of copper. Then,
exploitation sensitive coating, the circuit diagram is written on the board.
The unwanted copper is carven out from the board to create copper
"tracks", known as traces. This method is understood as halftone.
There square measure 2 different common ways used for developing connecting
traces. PCB edge may be a system wherever unwanted copper is removed with CNC
machines. Another method is Silk-Screen printing, wherever special ink that's
etch-resistant is employed to hide the areas wherever the copper traces have to
be compelled to be created.
Once the board is prepared with copper traces, holes square
measure trained into the board to assemble leaded electrical and electronic parts. For drilling, special
metallic element inorganic compound drill bits or optical device is employed.
The holes created square measure full of hollow rivets or coated through
exploitation associate electroplating method, therefore forming associate
electrical affiliation among the varied layers. Successive step is coating of
the complete board, except holes and pads, with masking material. Materials
ordinarily used for this purpose are: lead solder, lead free solder, OSP
(Entek), deep/hard gold (electrolytic nickel gold), immersion gold (electroless
nickel gold - ENIG), wire bondable gold (99.99% pure gold), immersion silver,
flash gold, immersion tin (white tin), carbon ink, and Sn 100CL, associate
alloy of tin, copper, and nickel. The last step is screen-printing, wherever
the legend and text square measure written on the PCB.
Before assembly of parts or delivery of computer circuit
Boards, the board ought to be tested to seek out any potential
"shorts" and "opens" that would cause a non-functioning
board. A "short" indicates the existence of associate unwanted
affiliation associated an "open" indicates that 2 points that ought
to are connected square measure unconnected. All such errors ought to be
mounted before PCB assembly. it's vital to notice that not all PCB producing
outlets check the boards before shipping, it's generally thought of an extra
value however a significant one to supply a completely functioning board before
adding parts.
PCB Assembly
Once the board is prepared, parts square measure assembled
and supplemental to the surface as per the circuit diagram. a number of the
common assembly techniques used square measure surface-mount construction and
through-hole construction. Sometimes, a mix of those 2 techniques is
additionally used for assembly.
Types of computer circuit Boards
Single Sided Board
This is the smallest amount complicated of the computer
circuit Boards, since there's solely one layer of substrate. All electrical
components and parts square measure mounted on one aspect and copper traces
square measure on the opposite aspect.
Double Sided Board
This is the foremost common style of board, wherever
components and parts square measure connected to each side of the substrate. In
such cases, double-sided PCBs that have connecting traces on each the
perimeters square measure used. Double-sided computer circuit Boards typically
use through-hole construction for assembly of parts.
Multi superimposed Board
Multi superimposed PCB consists of many layers of substrate
separated by insulation. Commonest multilayer boards are: four layers, six
layers, eight layers, and ten layers. However, the overall variety of layers
that may be factory-made can exceed over forty-two layers. These forms of
boards square measure utilized in very
complicated electronic circuits.
Assembling electronic circuits could be a good way of
learning natural philosophy, and relying upon the project undertaken, variety
of tools and parts could also be required consequently. But there are some
basic tools and electronic parts that are required in most electronic come and are
a 'must have.'
The first factor to think about is that the style of board
being employed. The board is what the circuit is assembled upon and connected.
There are 3 main varieties of circuit boards - the breadboard, the strip board,
and also the computer circuit board.
The breadboard is employed for creating temporary circuits
and doesn't need fastening whereas the opposite 2 sorts are each permanent and
need the components to be soldered on to them.
When functioning on computer circuit boards or strip boards,
the primary tool that's needed could be a hand tool. in conjunction with the
hand tool, a solder stand, reel of solder, and solder removal wick would even
be needed.
In addition to the higher than, aspect cutters are needed
for trimming the part leads, and wire strippers for trimming the wires. Little
try of snipe nose pliers is required for bending leads or holding small
components in situ whereas fastening.
A flat blade screwdriver, heat sink, and electrical drill
will be terribly helpful once functioning on electronic comes.
In addition to the tools, variety of electronic parts also
are needed relying upon the project. a decent assortment to start out with can
contain capacitors, resistors, variable resistors, diodes, transistors, wires,
switches, and an influence supply.
Having these basics can get you started experimenting with
electronic circuits.
Have you ever marvel why there area unit such a large amount
of capacitors in electronic circuit board? They’re all scattered through out
the full electronic board. You’ll see isinglass capacitors, ceramic capacitors,
metallic element capacitors, Al electrolytic capacitors, paper capacitors and
etc. All of them within the circuit have an operate and you'll be able to
realize widespread applications within the electrical and physical science
fields. a number of the common things during which capacitors area unit used
area unit as follow:
Electric Field-Power issue correction;-Motor begin and run;
and -Welding (stored energy in condenser discharged rapidly)
Electronic Field - Act as filter to get rid of ripple in
power supplies;
- As put down stage signal coupling condensers- A capacitor
won't pass DC, however associate AC signal can go through;
In today's article I am reaching to talks concerning
condenser act as filter to get rid of ripple from power provides. Once the AC
signal from output electrical device |more matured diodes it'd become an uneven
DC. A filtering section is employed to rid this uneven DC signal. Usually, the
filter includes one or additional capacitors. The capacitors area unit then
placed between the DC line and ground. the worth of the capacitors is chosen
fastidiously to allow the filter circuit a particular temporal order constant
or TC. This TC measures how briskly the circuit responds to changes within the
voltage level. If the circuit has simply the correct temporal order constant,
it will act to swish the output voltage, and once the voltage leaves the filter
stage, most of the variations or "ripple" ought to be removed. The AC
has been born-again into a swish DC.
If the filter capacitors fail either increase in ESR reading
or lose a number of its capacitance, the AC signal are allowed to stay with the
DC, making a symptom that is noisier than it ought to it. This unwanted noise
signal would cause issues in electronic circuit. If it happen in pc monitor
power provide, the unhealthy capacitors will cause power to blink, low power,
voltage termination, no display, and intermittent show downside ands more. Currently
you perceive why anytime once a monitor has the criticism like higher than, I’d
initial check all the secondary aspect filter condenser with my ESR meter. If
all capacitors checked okay I’d then travel to a different circuit. That is
only one of my troubleshooting ways.
Next, have you ever seen all insufficient blue caps around a
circuit board? Those small worth caps (usually zero.1uf fifty v or 104) are
accustomed take away noise from electronic circuit. Then what concerning the
operate of massive filter condensers we've got simply mentioned above-aren't
they already removed the unwanted signal? Why not one filter capacitor is
enough for every DC line voltage? the solution is that the massive filter
capacitors (large value) at the secondary aspect of power provides is to swish
the DC and take away unwanted lower frequency noise. Meantime the tiny blue
rosin coated ceramic disc condenser is simpler in shorting terribly high
frequency noise spikes to ground and to preventing it from obtaining back to
the ability supply route and traveling to different circuits.
Hope you’re currently perceive why there are 2 differing
types of capacitors within the DC supply route. By the manner for the tiny blue
condenser you'll be able to check it with analog meter set to X10k ohms
(charge/discharge) or simply use a digital capacitance meter to see for the
capacitance worth. the tiny blue condenser has terribly high possibilities to
travel totally shorted compare to electrical condenser that is extremely rare.