Wednesday, July 2, 2014

MLX71120 and MLX71121

Few days ago I was created a circuit diagram using the 315MHz ASK transmitter IC (integrated circuit). This time I would like to study or doing some research about the RF receiver with a use of MLX71120 and MLX71121 RF receiver applications in a balanced loop antenna.


The good news is, after doing plenty of research about RF receiver using MLX71120 and MLX71121 I found this site of Melexis that explain well on the function and where to use this RF receiver. Upon reading and exploring the site I found out that using this MLX71120 and MLX71121 will need exact computation.

Check this RF receiver MLX71120and MLX71121 for your reference.

Thursday, June 26, 2014

Low Cost Programming Kit

I heard few students that they are looking some low cost programming kit that they can use to their project. At back of my mind, I said yeah..!! Where can I get this low cost programming kit? After of doing some research and digging some site I found this MLXSPI-01 programming kit, which can support all Melexis kitparts using the SPI.

MLXSPI-01 programming kit features compatibility with nearly any running PC and easy to use software is included. This is specifically designed to program the Melexis family of kit parts using the SPI interface.

This programming kit is also combination of software and hardware, which the hardware need to be connect to the parallel port of a standard pc to operate while the software will generate the timing of all the signals. Check the site to understand more about low cost programming kit.

Thursday, June 19, 2014

Local Interconnect Network Overview

Did you know the exact meaning of LIN? I know many of you out there is thinking or searching what is LIN and what is the function of this. LIN is stands for Local Interconnect Network. LIN network is consists have LIN master and LIN slave and one LIN master typically has up to 16 slaves.

Local Interconnect Network group was founded in the late 1990s by the 5 European automakers Volcano Automotive Group and Freescale.  On November of 2002 the first fully version of LIN specification was implemented and published as LIN version 1.3. Version 2.0 of Local Interconnect Network was introduced on September 2003 to expand configuration capabilities and make provisions for significant additional diagnostics features and tool interfaces. For more understanding what is LIN all about check this LIN Video.

Frame Types of LIN:

  1. Unconditional Frame. These always carry signals and their identifiers are in the range 0 to 59 (0x00 to 0x3b). All subscribers of the unconditional frame shall receive the frame and make it available to the application (assuming no errors were detected).
  2. Event-triggered Frame. The purpose of this is to increase the responsiveness of the LIN cluster without assigning too much of the bus bandwidth to the polling of multiple slave nodes with seldom occurring events. The first data byte of the carried unconditional frame shall be equal to a protected identifier assigned to an event-triggered frame. A slave shall reply with an associated unconditional frame only if its data value has changed. If none of the slave tasks responds to the header the rest of the frame slot is silent and the header is ignored. If more than one slave task responds to the header in the same frame slot a collision will occur, and the master has to resolve the collision by requesting all associated unconditional frames before requesting the event-triggered frame again.
  3. Sporadic Frame. This frame is transmitted by the master as required, so a collision cannot occur. The header of a sporadic frame shall only be sent in its associated frame slot when the master task knows that a signal carried in the frame has been updated. The publisher of the sporadic frame shall always provide the response to the header.
  4. Diagnostic Frame. These always carry diagnostic or configuration data and they always contain eight data bytes. The identifier is either 60 (0x3C), called master request frame, or 61(0x3D), called slave response frame. Before generating the header of a diagnostic frame, the master task asks its diagnostic module if it shall be sent or if the bus shall be silent. The slave tasks publish and subscribe to the response according to their diagnostic module.
  5. User-Defined Frame. These can carry any kind of information. Their identifier is 62 (0x3E). The header of a user-defined frame is always transmitted when a frame slot allocated to the frame is processed
  6. Reserved Frame. These shall not be used in a LIN 2.0 cluster. Their identifier is 63 (0x3F).
Source: Wiki

Class AB 30W Amplifier Circuit

I was planning to create a 30w amplifier circuit for my project. 2 days of searching and stumbling around the net, then finally I found a site that answers all my questions and doubt about my project.  My amplifier circuit is a class AB 30w circuit amplifier.


Below is the instruction on how to set up the class AB amplifier circuit for 30 watts.

To set the above amplifier up, set R1 to max and R12 to 0. After doing this successfully, power on the amplifier. Set R1 so that the measured output offset is between 30 and 100mV. Once set, adjust R12 slowly to achieve a quiescent current of around 120mA. Keep checking the quiescent current as the amp heats up as it might change due to voltage drop changes in the output devices caused by heat. The heatsinks should be 0.6K/W or less for two amplifiers.


Tuesday, May 27, 2014

How to Invert 12V to 220V

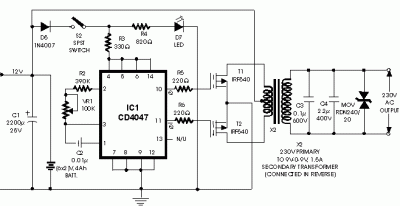
In my previous post, I share to you guys about the 12V to 220V inverter schematic. This time I would like to share again about inverter, but this time it’s how to make 12V to 220V inverter. The main component of this small voltage converter to transform 12VDC to 220VAC is the CMOS 4047. We will used this CMOS 4047 to stable the multi-vibrator, at pins 10 and 11 will have a symmetrical rectangular signal (square wave) which is amplified by 2 Darlington transistors and finally reach the secondary coil of mains transformer (2x10V/60W).

Below are the videos presentations of the comparison between without load and with load.

Video Presentation 1 – without load
Video Presentation 2 – with load (light bulb)

With the help of P1 the output frequency can be adjusted between 50Hz to 400Hz. Although this is not part of any professional dc ac converter it can be used quite effective on some home appliances. Be aware that the output signal is square and not sine wave. So you cannot use it for powering TV, Laptops, monitors. Use it only for lighting, power tools and other non-expensive equipment.

Below is the circuit schematic of the converter in 60 Watts  from DC to AC.

Thursday, May 22, 2014

Offline UPS (Uninterruptable Power Supply)

Creating your own offline ups circuit diagram is a good idea to secure your backup files is a really a wise idea. With the increasing daily support on networked data systems, the need for goofproof backup of power supply systems is now crucial.

UPS applications require a high-speed control MCU with multiple on-chip inverter and converter PWM control functions thus making the RL78/I1A an ideal choice for continuous commercial power supplies. Renesas delivers optimal solutions for UPS applications by providing a variety of semiconductor devices in addition to MCUs.

Below are the recommended products that you can use to your offline ups circuit diagram.

Recommended Products

Block Semiconductor device Recommended products Features, etc.
Controller MCU RL78/I1A Optimal for standby(offline) power systems. Timers, 5V operation, small package.
R8C Family Optimal for standby(offline) power systems. Timers, 5V operation, small package.
EEPROM R1EX24xxx Series
I2C bus interface. Optimal for power failure recording *1
R1EX25xxx Series SPI bus interface. Optimal for power failure recording *2
Step-down circuit MOSFET RJK60xxDPK Low on-resistance, high-speed switching
Step-up circuit MOSFET RJK1003DPN Low on-resistance, high-speed switching
Inverter MOSFET RJK40/50/60xxDPK Low on-resistance, high-speed switching
IGBT RJH60DxDPP/DPK, RSH60FxDPK low VCE(sat), FRD on-chip
PFC
power supply
IGBT RJH60DxDPP/DPK low VCE(sat), FRD on-chip
PFC IC R2A20115, R2A20112, R2A20117, R2A20118A, R2A20104
Power supply, etc. Photocoupler
(standard)
PS23xx Series
PS27xx Series
PS28xx Series
High isolation voltage (5kVr.m.s.), 4p-LSOP, Ta=115°C
High isolation voltage (3.75kVr.m.s.), 4p-SOP, Ta=110°C
High isolation voltage (2.5kVr.m.s.), 4p-SSOP, Ta=110°C
Photocoupler
(IGBT drive)
PS93xx Series
(6/8p-SDIP)
PS94xx Series
(16p-SOP)
PS95xx Series
(8p-DIP)
PS99xx Series
(8p-LSDIP)
High isolation voltage (5kV~7.5kVr.m.s.)
0.6~2.5A output
High CMR (CMR≧50kV/μs)
Op-amp HA1630xxx series, μPC358
MCU peripheral Reset IC RNA519xx Series Variable detection voltage
*1 I2C : Inter-Integrated Circuit
*2 SPI : Serial Peripheral Interface

Tuesday, May 13, 2014

12v to 220v Inverter Schematic

I would like to learn on how to invert 12V DC to 220V AC for 100 watts that’s why I’m doing my research about this because I’m not an Electronic or even an Electrical Engineer.  So I need more info on how to do it right to avoid accident. By doing the research I found some techniques and tutorials on how to do it easy without deep understanding on it.

In this 12v inverter circuit diagram I used the IC 4047 – IRF540 instead of transistor 2N3055 because it is a good idea power output for 100W from the transformer 2-3A. For the information for those who did not know yet that AC can’t be stored for future use but DC can be stored for future use in a battery. The stored DC can be converted back to AC by using power inverters. Below is the schematic diagram of the inverter that I made.

I also created a circuit diagram inverting 12V DC to 220V AC for 500 Watts.